In the first of this three part series of posts, I will breakdown the components of an Azure ARM template, and the tools used to develop one. Then in part two I will cover testing an ARM template. And finally in part three, I will cover deploying the resources in the ARM template to Azure.
The ARM template will consist of the following resources:
- Windows VM
- Network Interface
- Public IP
- Virtual Network
- Network Security Group
- Storage Account

Getting Started
Before looking at Bicep, Terraform or Pulumi, I think it’s important to get to know the process of developing Azure ARM templates from scratch. Check out Sam Cogan’s ARM Template Masterclass YouTube series on developing ARM templates. This was an invaluable resource when I got started.
I use the following tools to complete the development, testing and deployment of ARM Templates:
- VS Code to author the templates
- VS Code Extension: Azure Resource Manager (ARM) Tools for ARM snippets and auto-completion
- VS Code Extension: ARM Template Viewer
- Pester PowerShell module used for when creating manual tests
- Arm-ttk PowerShell module for analysing and testing ARM templates against coding best practice
- Az PowerShell module or Azure CLI for deploying the templates
ARM Components
Using VS Code and with the Azure Resource Manager (ARM) Tools extension installed, create a new json file and start typing arm.

Select arm!. This will create the basic framework of an ARM template.

I will go through each section of the ARM template for creating the resources above.
Parameters
TIP: Hit return in the parameters braces, start typing
newand selectnew-paramter.

The extension will create the basic parameter configuration for you

In the template, the prefix parameter is simply a string which I am adding to each resource name. Using an ARM template function called concat, I can combine multiple string values to create a concatenated string. String concatenation is simply joining two strings together to make a new string.
"prefix": {
    "type": "string",
    "metadata": {
        "description": "Prefix used for naming resources."
    }
},
The location parameter is used to specify the location of the resources. You will quite commonly see "[resourceGroup().location]" specified as the location of each resource. However, the arm-ttk (next post) complains about this when validating the template. So the location will be stored in the parameters file.
"location": {
    "type": "string",
    "metadata": {
        "description": "Location of the resources"
    }
},
The vmSize parameter will specify the size of the Azure Virtual machine.
"vmSize": {
    "type": "string",
    "metadata": {
        "description": "Size of VM to deploy."
    }
},
The windowsOSVersion parameter will have a default value of 2016-Datacenter, which is what will be selected if the parameter value is empty during the time of deployment. Notice the list of allowedValues. This means only these three OS values are allowed as a parameter.
"windowsOSVersion": {
    "type": "string",
    "defaultValue": "2016-Datacenter",
    "allowedValues": [
        "2016-Nano-Server",
        "2016-Datacenter",
        "2019-Datacenter"
    ],
    "metadata": {
        "description": "The Windows version for the VM."
    }
},
The adminUsername parameter is used to specify the name of the local admin user to be created on the VM.
"adminUsername": {
    "type": "string",
    "metadata": {
        "description": "Username for the VM."
    }
},
And finally, the adminPassword parameter is a secure string to set the password of the newly created admin user. You can either enter this password at deployment time, store it in plain text in your parameter file, or retrieve the secret from Azure Key Vault.
"adminPassword": {
    "type": "securestring",
    "metadata": {
        "description": "Password for the adminUsername."
    }
}
Variables
Variables allow you to re-use expressions throughout a template without re-writing them. Only one variable is used in this template which is storageAccountName. As you may know every Azure Storage Account must have a unique name, so a pretty good way of creating a unique one without checking first is by using some built-in string functions. In the example below the first toLower function is setting every alphabetic character to lower case. Then the concat function will join the prefix parameter together with ‘stg’ (short for storage), along with a 13 character, random string.
"variables": {
    "storageAccountName": "[toLower(concat(parameters('prefix'),'stg',uniqueString(resourceGroup().id)))]"
},
Let’s say for example the prefix is set to “DEVTEST”:
“devtest” + “stg” + “sh5ysh38jr74j”
The storage account will be named as follows:
“devteststgsh5ysh38jr74j”
Resources
TIP: Hit return in the resources braces, start typing
stand selectarm-storage. The config snippet for a Storage Account will be generated for you. You can select any resource and the snippets will generate an example configuration.

The first resource in the template is the Storage Account. The variable storageAccountName defined earlier is used for the name and displayName tag. The sku defined is Standard_LRS.
{
    "name": "[variables('storageAccountName')]",
    "type": "Microsoft.Storage/storageAccounts",
    "apiVersion": "2019-06-01",
    "location": "[parameters('location')]",
    "tags": {
        "displayName": "[variables('storageAccountName')]"
    },
    "sku": {
        "name": "Standard_LRS"
    },
    "kind": "Storage"
},
The next resource is the Public IP. Notice the name is a concatenated string of the prefix parameter and -PublicIP. This naming convention is used on all other resources in the template.
{
    "name": "[concat(parameters('prefix'),'-PublicIP')]",
    "type": "Microsoft.Network/publicIPAddresses",
    "apiVersion": "2019-11-01",
    "location": "[parameters('location')]",
    "tags": {
        "displayName": "[concat(parameters('prefix'),'-PublicIP')]"
    },
    "properties": {
        "publicIPAllocationMethod": "Dynamic",
        "dnsSettings": {
            "domainNameLabel": "[toLower(parameters('prefix'))]"
        }
    }
},
The Network Security Group (NSG) specifies an inbound allow rule on TCP port 3389 for RDP access. Any source address is allowed so it can be accessed over the internet.
{
    "name": "[concat(parameters('prefix'),'-nsg')]",
    "type": "Microsoft.Network/networkSecurityGroups",
    "apiVersion": "2018-08-01",
    "location": "[parameters('location')]",
    "properties": {
        "securityRules": [
            {
                "name": "nsgRule1",
                "properties": {
                    "description": "description",
                    "protocol": "Tcp",
                    "sourcePortRange": "*",
                    "destinationPortRange": "3389",
                    "sourceAddressPrefix": "*",
                    "destinationAddressPrefix": "*",
                    "access": "Allow",
                    "priority": 100,
                    "direction": "Inbound"
                }
            }
        ]
    }
},
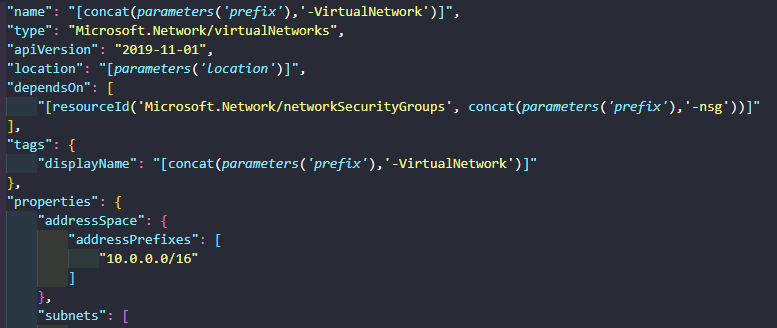
The Virtual Network (VNet) has a dependsOn element set for the NSG above. Usually resources are created in parallel, but this means the VNet will not be created until the NSG has.
The VNet will also be created with an address space of 10.0.0.0/16 and a subnet, called subnet1, with an address prefix of 10.0.0.0/24. The subnet is being assigned the NSG, hence the reason why the NSG must exist before the creation of the VNet.
{
    "name": "[concat(parameters('prefix'),'-VirtualNetwork')]",
    "type": "Microsoft.Network/virtualNetworks",
    "apiVersion": "2019-11-01",
    "location": "[parameters('location')]",
    "dependsOn": [
        "[resourceId('Microsoft.Network/networkSecurityGroups', concat(parameters('prefix'),'-nsg'))]"
    ],
    "tags": {
        "displayName": "[concat(parameters('prefix'),'-VirtualNetwork')]"
    },
    "properties": {
        "addressSpace": {
            "addressPrefixes": [
                "10.0.0.0/16"
            ]
        },
        "subnets": [
            {
                "name": "Subnet01",
                "properties": {
                    "addressPrefix": "10.0.0.0/24",
                    "networkSecurityGroup": {
                        "id": "[resourceId('Microsoft.Network/networkSecurityGroups', concat(parameters('prefix'),'-nsg'))]"
                    }
                }
            }
        ]
    }
},
The Network Interface (NIC) resource has two dependsOn elements; the Public IP and VNet resources. This is because the NIC will be assigned a public IP and to the newly created subnet, so the resources must exist before the NIC.
{
    "name": "[concat(parameters('prefix'),'-NetworkInterface')]",
    "type": "Microsoft.Network/networkInterfaces",
    "apiVersion": "2019-11-01",
    "location": "[parameters('location')]",
    "dependsOn": [
        "[resourceId('Microsoft.Network/publicIPAddresses', concat(parameters('prefix'),'-PublicIP'))]",
        "[resourceId('Microsoft.Network/virtualNetworks', concat(parameters('prefix'),'-VirtualNetwork'))]"
    ],
    "tags": {
        "displayName": "[concat(parameters('prefix'),'-NetworkInterface')]"
    },
    "properties": {
        "ipConfigurations": [
            {
                "name": "ipConfig1",
                "properties": {
                    "privateIPAllocationMethod": "Dynamic",
                    "publicIPAddress": {
                        "id": "[resourceId('Microsoft.Network/publicIPAddresses', concat(parameters('prefix'),'-PublicIP'))]"
                    },
                    "subnet": {
                        "id": "[resourceId('Microsoft.Network/virtualNetworks/subnets', concat(parameters('prefix'),'-VirtualNetwork'), 'Subnet01')]"
                    }
                }
            }
        ]
    }
},
Finally, the last resource in the template is the Virtual Machine (VM). Another two dependsOn elements are defined; the Storage account and the NIC resources. This is because the VM is assigned a NIC and boot diagnostics is enabled in the Storage Account specified.
Other areas of note are the vmSize, adminUsername, adminPassword, and windowsOSVersion parameters are all referenced.
{
    "name": "[concat(parameters('prefix'),'-VM')]",
    "type": "Microsoft.Compute/virtualMachines",
    "apiVersion": "2019-07-01",
    "location": "[parameters('location')]",
    "dependsOn": [
        "[resourceId('Microsoft.Storage/storageAccounts', variables('storageAccountName'))]",
        "[resourceId('Microsoft.Network/networkInterfaces', concat(parameters('prefix'),'-NetworkInterface'))]"
    ],
    "tags": {
        "displayName": "[concat(parameters('prefix'),'-VM')]"
    },
    "properties": {
        "hardwareProfile": {
            "vmSize": "[parameters('vmSize')]"
        },
        "osProfile": {
            "computerName": "windowsVM1",
            "adminUsername": "[parameters('adminUsername')]",
            "adminPassword": "[parameters('adminPassword')]"
        },
        "storageProfile": {
            "imageReference": {
                "publisher": "MicrosoftWindowsServer",
                "offer": "WindowsServer",
                "sku": "[parameters('windowsOSVersion')]",
                "version": "latest"
            },
            "osDisk": {
                "name": "[concat(parameters('prefix'),'-VMOSDisk')]",
                "caching": "ReadWrite",
                "createOption": "FromImage"
            }
        },
        "networkProfile": {
            "networkInterfaces": [
                {
                    "id": "[resourceId('Microsoft.Network/networkInterfaces', concat(parameters('prefix'),'-NetworkInterface'))]"
                }
            ]
        },
        "diagnosticsProfile": {
            "bootDiagnostics": {
                "enabled": true,
                "storageUri": "[reference(resourceId('Microsoft.Storage/storageAccounts/', variables('storageAccountName'))).primaryEndpoints.blob]"
            }
        }
    }
}
Outputs
The final section of the ARM template is outputs. You can use outputs when you need to return values from the deployed resources. After deploying this template (future post) the VM DNS Name and the VM’s private IP values will be displayed.
"outputs": {
    "VMDNSName": {
        "type": "string",
        "value": "[reference(concat(parameters('prefix'),'-PublicIP')).dnsSettings.fqdn]"
    },
    "VMPrivateIP": {
        "type": "string",
        "value": "[reference(concat(parameters('prefix'),'-NetworkInterface')).ipConfigurations[0].properties.privateIPAddress]"
    }
}
Parameters File
You can create a separate JSON file that contains the parameter values, rather than passing them in at the time of deployment. Here is an example of the parameters file I used when deploying the template.
{
    "$schema": "https://schema.management.azure.com/schemas/2019-04-01/deploymentParameters.json#",
    "contentVersion": "1.0.0.0",
    "parameters": {
        "prefix": {
            "value": "mkarmdev"
        },
        "location": {
            "value": "west europe"
        },
        "vmSize": {
            "value": "Standard_A2_v2"
        },
        "windowsOSVersion": {
            "value": "2016-Datacenter"
        },
        "adminUsername": {
            "value": "azureuser"
        },
        "adminPassword": {
            "reference": {
                "keyVault": {
                    "id": "/subscriptions/<ID>/resourceGroups/<RG>/providers/Microsoft.KeyVault/vaults/<NAME>"
                },
                "secretName": "vmAdminPassword"
            }
        }
    }
}
Complete Template on GitHub
You can find the complete template and parameters file on GitHub.
Summary
Finally, save the ARM template as you wish. You will commonly see azuredeploy.json but I saved mine as NewVM.json, and the parameters file as NewVM.parameters.json.
Hopefully the above information is clear. In the next two posts I will walk through testing and deploying the template.